Home Composting Basics
New to composting or looking to improve your practices? Read on or download our User's Guide to Backyard Composting (PDF) to get started. You can also attend one of our home composting workshops, watch a recording of our compost workshop or contact us with your composting questions.
What is compost?
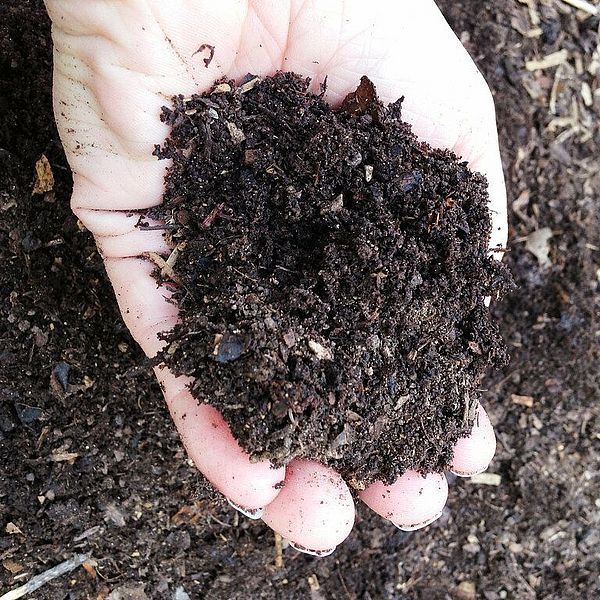
In natural ecosystems, dead plants and animals decompose into the soil, where the nutrients are recycled into new life. Composting is when humans manage natural biological decomposition. Finished compost is stable, humus-like organic matter that contains a diverse population of microorganisms. Microbes and organic matter generate the structure and fertility of healthy soil, holding on to water and making nutrients available to plants. The many environmental benefits of composting organic waste include reducing greenhouse gas emissions, recycling nutrients locally, and creating a resource for growing healthy soil and food in our communities.
Compost ingredients
“Greens” and “browns” are the two types of ingredients in compost. For every container of food scraps, add three containers of browns. This ratio of one part greens to three parts browns gives the microbe decomposers a balanced diet of carbon and nitrogen to break down the food scraps without odors. Using plenty of browns makes it more pleasant for you, speeds up the compost process, and deters wildlife.



Greens are rich in nitrogen:
- Fruit & veggie scraps
- Bread, grains, & pasta
- Eggshells & small amounts of egg
- Coffee grounds & filters
- Tea bags & loose tea
- Fresh grass clippings
- Fresh garden clippings
Chop scraps into small pieces to speed up decomposition. Check out our other tips for collecting food scraps.
Browns are rich in carbon:
- Dry leaves
- Straw & hay
- Wood chips & shavings
- Small sticks & twigs
- Dry grass & garden clippings
- Shredded newspaper
- Paper towels & napkins
- Cardboard, paper egg cartons
Collect browns in the fall when they are abundant. Consider shredding leaves with a bagging lawn mower or trimmer to prevent them from compacting in the compost pile. Keep browns dry in an extra compost bin, in a trash can with a lid, or under a tarp, and store them next to the compost pile for easy access.
What to keep out:
- Meat, bones, fish & grease*
- Large amounts of dairy
- Produce stickers
- Weed seeds
- Diseased & invasive plants
- Dog or cat feces or litter
- Paper with glossy colors
- Pesticide-treated materials
- Cut flowers from a florist
*If you compost at home, you can still throw away meat, bones, fish, and grease after July 1, 2020. Alternatively, use a Green Cone, take meat scraps to a town drop-off or the District Transfer Station, or bury bones in your garden 18 inches to two feet deep.
Compost containers
Containers keep the pile tidy and help keep out pets and wildlife. Line your bin with quarter-inch hardware cloth (wire mesh) to make it rodent-resistant. Remember, decomposition is a natural process that will happen whether or not you use a container. There are many options for containers. Here are just a few. Check out our User's Guide to Backyard Composting for more ideas. Pick one that will best suit your needs.
- Pallet Bin: Get four wood loading pallets (the District Transfer Station often has free pallets). Wire three pallets together at the corners, leaving one side open. Line the bottom and sides of the bin with quarter- or half-inch hardware cloth (wire mesh). Line the fourth pallet with hardware cloth and attach with wire or hinges as a door. Optional: add pallets to create a 2- or 3-bin system. Get detailed instructions.
- Tumbler: Tumblers work well as a fully-enclosed first step in a compost system that finishes in a bin or pile. Start with a scoop of finished compost or soil to inoculate with microbes. Add food scraps and browns, turning occasionally to mix. When it’s full, empty into a bin or pile, cover with browns, and let sit for several months before using.
- Store-Bought Bin: The District Transfer Station sells compost bins. Simply assemble the bin, and starting with browns, begin layering materials. Consider laying down a piece of quarter- or half-inch hardware cloth (wire mesh) underneath the bottom of the bin. The mesh should extend past the walls of the bin by a few inches.
Location
Locate your compost pile in a well-drained area that is easily accessible. Consider whether you will need access to the compost during the winter or if you will bring food scraps to a drop-off location during snowy months.
Building the pile
- If you’re using a bin that is open on the bottom, consider laying down a piece of quarter- or half-inch hardware cloth (wire mesh) underneath the bottom of the bin. The mesh should extend past the walls of the bin by a few inches. Secure with rocks or soil.
- Next, add a layer of browns to absorb moisture and allow air into the bottom of the pile. Coarse materials such as wood chips or criss-crossed dry plant stalks or sticks work well for this layer.
- Now you’re ready to add greens—food scraps and other fresh, moist materials. Mix or layer in plenty of browns.
- Every time you add greens, finish by covering with a layer of browns to filter odors and deter flies and wildlife. Make sure no food scraps are visible from the outside of the pile.
Managing the pile
Just like you, the microbes in your compost need food, water, and air. The pile should be as moist as a wrung-out sponge. Any wetter and odor-causing microbes will take over—which stinks! Adding plenty of browns of various sizes creates air space, as does turning or mixing the pile. You can occasionally turn the pile by moving it into an empty bin, rotating it in a tumbler, or stirring it with a pitchfork or aerator tool. While optional, turning speeds up decomposition.
Commercial compost piles reach high temperatures that decompose materials quickly and destroy pathogens and seeds. Most home compost piles are too small to generate much heat and take several months to finish. Seeds and pathogens aren’t guaranteed to die in a “cold” compost, so keep meat, weeds, and diseased plants out of the mix. For hot composting, you need at least one cubic yard of material and the right carbon to nitrogen ratio.
Composting in winter
Think of tromping through the snow to your pile as fresh air and winter exercise! Or, you can take a break from composting at home and bring your scraps to a drop-off location. Scraps will pile up when they freeze. Start winter with an extra or empty bin to accomodate the volume. The pile will shrink significantly come spring. Keep adding browns!
Harvesting & using compost
It takes several months to a year for a cold compost pile to finish. Take finished compost from the bottom of the pile if you don’t want to wait for the whole pile to finish composting. When compost is ready, it smells earthy and looks like dark mulch or soil—or crumbly chocolate cake! You may still see broken egg shells, small sticks, or other chunks. Optional: Screen it! If you prefer a less chunky product, screen it. Use a mesh nursery tray or make a screen by stapling ½” hardware cloth to a lumber frame. Sift compost through the screen, and return large intact materials to your compost pile.
Using compost
- Lawn: Compost will reduce watering needs and help prevent erosion. Apply a layer up to a quarter inch deep. Water thoroughly.
- Garden beds: Add compost every year before planting. Apply 2-4 inches (more for deficient soils) as a top dressing or turn into the soil. Apply a top dressing again in the fall.
- Planting: Mix 1 part compost with 2 parts soil to use as potting mix.
- Established trees & shrubs: Top dress a 1 to 2 inch layer of compost a few inches from the base of the plant in the spring or early summer.
- Potted plants: Add compost to soil when you repot your plants (no more than 1 part compost to 2 parts soil). Or top dress with a quarter inch layer of compost and scratch into the potted soil.
- Starter mixes: Create your own seed starter mix using: 1 part mature sifted compost, 2 parts soil, 1 part sand, perlite, or vermiculite.
- When mulching: Put compost around plants before adding mulch.
Troubleshooting
Many common composting challenges have simple solutions.
If your compost stinks...
Make sure you’re not adding any meat, bones, fish, shellfish, fats, grease, or large amounts of dairy to the pile. Turn or mix the pile to aerate it. Break up any compacted or especially wet areas. Mix in browns such as dry leaves, straw, or wood shavings. Finish by covering the pile with several inches of browns to act as an odor filter. Even if you can’t turn the pile, covering with browns will filter odors significantly. Going forward, be sure to add three times the amount of browns as greens every time. A well-managed compost pile should smell earthy, not stinky!
If your compost is attracting animals or pets...
Make sure you’re following all the steps listed above to reduce odors. To keep small animals out, line your compost system with hardware cloth or start materials in a tumbler. Regularly turn your pile so it composts more quickly. To deter bears, take down bird feeders between March and December and secure your trash (make sure neighbors do, too). Do not add sweet-smelling fruit (such as cantaloupe rinds) between March and July. Bury these items or take them to a drop-off location. Leave an ammonia-soaked rag in a bucket next to your pile. Replace every 2-3 weeks.
If a bear enters your yard, make noise! Yell or bang pots and pans so it has an unpleasant experience, making it unlikely to return. You can stop composting at home until the bear leaves the area (bring scraps to a drop-off location) or surround your bin with an electric fence (bate the fence with peanut butter). Contact VT Fish & Wildlife for advice before a bear becomes a problem and to report if you have a bear incident. They track bear activity through residents' reports and can intervene if there is a pattern of human-bear interactions to prevent future property damage or harm to the bear. Report a bear incident here: https://anrweb.vt.gov/FWD/FW/WildlifeBearReport.aspx.
Dogs are sometimes attracted to decomposing food, which when ingested can be toxic to them. Therefore, dog owners should keep an eye on their pet when it's outside. It may be useful to know how neighbors are handling food waste as dogs are sometimes attracted to neighboring compost piles. For dog owners composting on-site, we recommend using an enclosed composting bin such as the ones we sell, a tumbler or pallet bins lined with hardware cloth. Remember to always cover fresh food scraps with 2-3 large scoops of brown material.
If your compost is attracting flies...
Flies are not bad for compost, they are just unpleasant for you. Cover exposed food scraps with browns such as dry leaves or wood shavings, or bury fresh scraps deeper in the pile. In the kitchen, cover scraps with sawdust or wood shavings, or keep the container in the fridge or freezer to prevent fruit flies.
Get a compost bin
ACSWMD has compost bins and kitchen collectors available for purchase at the District Transfer Station.
